IMPLANTATION GUIDE
LifeChip® Implantation Video
EQUINE LIFECHIP IMPLANTATION PROCEDURE
Precautions:
Thoroughly read directions in their entirety before administration and follow as instructed. Failure to follow directions and precautions may result in improper delivery and performance.
This product is intended for administration by or under the supervision of an accredited veterinarian or according to state laws.
Do not use this product if the protective package containing the pre-loaded syringe is torn or punctured, as sterility could be compromised.
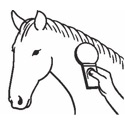
1. Identify the administration site: left side of neck halfway between the poll and withers and approximately 1.5 to 2.0 inches below mane line in nuchal ligament.

2. Scan the administration site and surrounding area with an approved RFID reader to assure horse has not been previously microchipped.
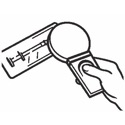
3. Scan the microchip in the package to ensure proper RFID reading and to verify that number scanned matches the one printed on the bar code labels.
4. Clean and aseptically prepare site for implantation.
5. Remove the needle cap, insert needle up to its base in a 90° angle, and depress plunger.
6. Apply light pressure to the administration site when removing the delivery device and afterward to minimize any bleeding.
7. Properly dispose of needle and syringe.
8. Rescan the microchip to ensure proper implantation.
9. Affix bar code label to horse’s records and retain the code for future reference.
10. Record the microchip number with appropriate breed association or database.
11. Horse might have a discomfort similar to a routine intramuscular injection or present stiffness and soreness for a few days after implantation. It is best to microchip a horse when it has a day or two off from strenuous activities. Please plan accordingly.

Destron Fearing™